.jpg)
This is an interesting project that anyone can do with all the extra wine corks laying around the house. Collect all your wine corks and make your kitchen, work or desk space less cluttered with a nice display board.
Time: 2.5 hours. You’ll need:
Wine corks.
Picture frames (preferably with a nice frame).
Acrylic paint.
Glue gun with sticks.
1. Gather all your requirements.
2. Paint the picture in the picture frame (or background paper) with black acrylic paint.
3. Let dry, place corks horizontally on the surface and position them so they all fit nicely.
4.Take a few corks out at a time so as to not lose the arrangement of the corks on the board.
5. Glue each one individually on one side and place back in it’s spot not he board.
6. Hang the new cork boards on the wall and start pinning things.
.jpg)
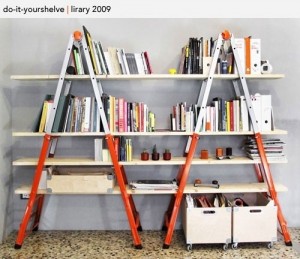 If you were thinking of spicing up your home a little bit and wanted to add some ambiance and organization, try adding a bookshelf. One, you can keep organized with your entire family’s reading, and two, the bookshelf will be a classy addition to your home that also looks good.
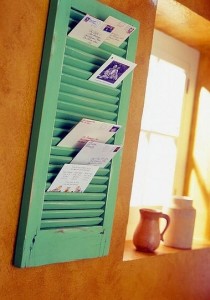 Window Shutter Mail Holder
 With a little bit of PVC piping, the kind you would use to build a waterway or a house’s plumbing, you can create an easy way to get organized with any extra shoes you may other wise have laying around. Whether they are yours and laying around in your closet with no better place to be, or they are your kids and family’s laying around in the house always ready to make a mess and add to clutter, you can take care of this by creating a little home for each pair. All you’ll need is a circular saw and some work goggles. Take a look at the picture.
 DIY Nightlight / Emergency Lighting
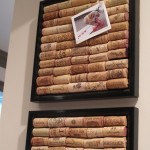 Need a way to communicate with your family that looks classy and is not costly? You could post one of these behind your front door to instantly communicate with your family and leave a message behind such as the week’s assignment of chores. Try getting a painting frame, size of your choice, and filling it up with used wine corks.
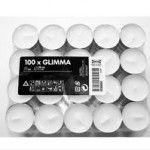 Tea Light Candles: These are best to buy in bulk. The more you buy in one set, the less you will pay for the individual candles. As a reference, you should be able to find a pack of 100 unscented tea lights for about $10, which amounts to 10 cents a candle. You’re not going to buy the flowery, scented, colored candles from a luxury store. Those will be way over priced, and you might as well pay for heating.
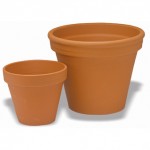 Terra Cotta Pots: You will want two different sizes here: a larger one and a smaller one. The smallest one should be able to sit on the rim of the pan without falling in, and the larger one should just about cover the whole surface of the pan without going too much over the sides.
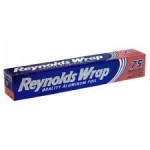 Aluminum Foil: You won’t need a whole roll, just a sheet to fold up into a disk and place over the hole at the bottom of your terra cotta pot, to keep the heat in. This should be reusable. Hopefully you have some aluminum foil at home, or can borrow some from a friend.
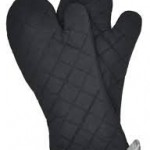 Oven Mitts: These pots and the baking pan will reach super high temperatures (160*), so you’ll need something to handle them.
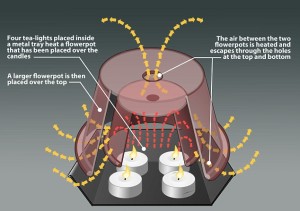 smaller terra cotta pot on top of the pan with the bottom facing up. Wad the aluminum into a disk that will cover the hole in the bottom of the smaller pot. Place the larger pot on top of the pan over the smaller one also with the bottom up, and this time leave the hole unplugged. There should be enough space between them for maybe an inch of air around the sides.